Tuesday, July 26, 2011

A Calm Night & Rafiki

If you read my previous post 'Elephant Kisses' then you know I was completely inspired to make another mixed media canvas project. I titled it 'A Calm Night'.
I almost didn't title it but there was a huge empty space and it didn't seem right. I used Basic Grey's Out of Print paper pad for the mosaic background. I then painted over it with twinkling H2O's starter pack colors, and smooch mists (which I mixed with water to dilute the color a little). I added the houses and trees by using markers, smooch ink, and stickles.

I created stars in the sky with stickles and liquid pearls. For the moon I used a journaling stencil and just followed it around with stickles. I added a gem to the middle empty space to complete it.
I absolutely love buttons and recently I saw a page that had buttons as the clouds. I had to steal that idea stat ;)


I also did a layout recently for the July/August Scraps of Darkness Round Robin. I followed Celina (Forevervampress) and I got to lift her Sleep layout. Here is 'Rafiki'
This is me at Animal Kingdom at Disney World last year. I painted the border and used mists and streaks of paint on the background. I fussy cut the flowers and used a stickles/liquid pearls border around the pic. I used the July Scraps of Darkness kit for this page.

Tuesday, July 19, 2011

Elephant Kisses

So my cousin (who is really like a sister to me) has been going through a really tough time. She is also in the process of moving to a new place. So when I saw my July kit from Scraps of Darkness and that it involved elephants I knew I had to make her a cheering up/ housewarming present. My cousin has this (unhealthy ;)) obsession with elephants. As does her mother (my aunt) who used to give us 'elephant kisses' when we were younger. Hence the title of my project:
I used a 10x10 canvas for this. I used papers from the kit as the background and painted over it with water colors, acrylics, and mists. It was a complete trial and error thing. I tried something, if I didn't like it I spritzed it with water, rubbed a paper towel over it, and tried something else. I am pretty happy with the results and it was so much fun to make. Completely de-stressing.
To make the frame I stamped an image with gesso, and painted a square around the canvas with gesso, added embossing powder, heat embossed it, and then I went over it with a watercolor. I added the jewels to balance the flowers on the other corners out.
This was another trial and error result. I misted a doily to put in the center and I really hated how it came out. I tried something else, and then I realized that I did like the edges of the doily. So I tore those off and did a makeshift circle (the edges might not have torn off as cleanly as I would have liked). I added stickle dots and a stickle border and I filled in the center with gold paint. I really love how it frames the elephants and gives the project texture.

I had so much fun creating this that I have become completely inspired to do more mixed media canvas projects. I am working on one right now that I am loving how it's turning out. Can't wait to share it with you all!!

Sunday, July 17, 2011

Disney Safari *Little Shop of Sketches*

So this week a new sketch for Little Shop of Sketches is out. Here is the fabulous sketch by Anne Pennington:
Now I have to admit that due to some personal things happening in my life right now I have really been struggling with scrapping lately. So I am not really satisfied with my take. However the other DT layouts are fabulous!!
This is titled 'Disney Safari' and I made it using the Scraps of Darkness June kit. Actually the sketch worked really well showcasing these pictures. Ironically only 8 pictures came out really well. I learned during this expedition that it is really hard to take pictures over the head of an 8 year old while in a moving vehicle.

What I love most about this page is the chipboard pieces. I think the colors turned out really well.

Remember to come play along at the ning site!!

Tuesday, July 5, 2011

Take the Scenic Route

This is a new page for my parent's scrapbook. They are random pics from the drive they took from northern California to Oregon. I finished this page yesterday on the 4th of July which is why I think I felt so inspired to use the red, white and blue color scheme. It is titled 'Take the Scenic Route'.
I spent a long time creating the border around the die cut and circle. I made it with a straight punch which I then cut after every couple of loops to be able to create the curves. I created this page for the July Round Robin challenge over at sb.com. I am in week one and so I had to create a page to inspire the other three weeks. I hope they like this. This is also for the July color challenge over there. That challenge was to use red, white, and blue without using patriotic themed collections. I mostly used the Travel Forever collection by Best Creation. I didn't even realize I was using those colors until half-way though.

In other news, I got published in Scrapstreet magazine!! You can see my page on page 17 in The Spotlight.

Saturday, July 2, 2011

Little Angel (Little Shop of Sketches)

I am so excited to share with you my take on this week's 
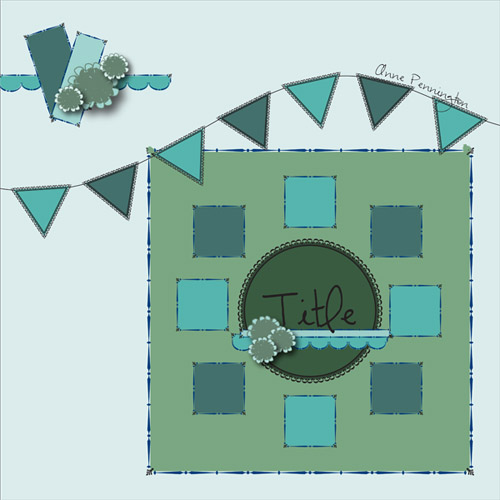
Little Shop of Sketches sketch. One of my fantastically creative co-design team members Anne Pennington stepped up and created this sketch for Tanya. Here is the sketch:
I literally created this page almost instantly after receiving this sketch. I had so much fun with it! The page is titled 'Little Angel' and features my niece Shea. This is also for my parent's scrapbook (which I seriously need to finish one of these days).
When I saw this sketch I knew I wanted to use doilies as a mask. Unfortunately I has none in my stash (so sad). When I looked it up online I was dismayed to see a pack of three go for almost 4 dollars! I went to my local Hobby Lobby and in the cake decorating section they had packs of 6 (for the big sizes) up to 32 (for the small sizes) for only 2 dollars! I ended up getting 4 different sizes with a total of 50 or more doilies for only 9 dollars. I get sad when I think how some manufacturers overcharge like crazy, and I buy into it because I am so caught up in the coolness of the product! Well thanks to this experience I am going to try harder to be more vigilant about product prices. Ok rant over. Sorry =/
I placed the doily over the papers and just gooped on the gesso. I let it dry a little but not a lot and then spritzed it with a pink mist and a green one. I am crazy in love with how it turned out. It looks much more fantastic in real life too. I also toned down the papers by painting a thin coat of white over them.
I used a smaller doily as a mask for the top. I placed the ribbon, then the doily, and then I misted it. The chipboard title is from Mandy aka Craftysprinkles. Thanks!! I used smooch ink in pink on it and then went over it with some stitckles.
I created the frame around the picture with some smooch ink and stickles. I found this flourish in my stash (that I has completely forgot about) and added it to the bottom of the pic. I cut a piece off of it and used it for the top flower. I very rarely use the whole flourish anymore. I am always cutting them up to suit my needs.
I am not a big fan of pink so I was completely surprised to find these flowers in my stash. I was extremely happy though as I think they went perfectly with the design.

I hope you like and please come play along with us at Little Shop of Sketches!!!

LinkWithin

Related Posts Plugin for WordPress, Blogger...