If you read my previous post 'Elephant Kisses' then you know I was completely inspired to make another mixed media canvas project. I titled it 'A Calm Night'.
I almost didn't title it but there was a huge empty space and it didn't seem right. I used Basic Grey's Out of Print paper pad for the mosaic background. I then painted over it with twinkling H2O's starter pack colors, and smooch mists (which I mixed with water to dilute the color a little). I added the houses and trees by using markers, smooch ink, and stickles.
I created stars in the sky with stickles and liquid pearls. For the moon I used a journaling stencil and just followed it around with stickles. I added a gem to the middle empty space to complete it.
I absolutely love buttons and recently I saw a page that had buttons as the clouds. I had to steal that idea stat ;)
I also did a layout recently for the July/August Scraps of Darkness Round Robin. I followed Celina (Forevervampress) and I got to lift her Sleep layout. Here is 'Rafiki'
This is me at Animal Kingdom at Disney World last year. I painted the border and used mists and streaks of paint on the background. I fussy cut the flowers and used a stickles/liquid pearls border around the pic. I used the July Scraps of Darkness kit for this page.
Tuesday, July 26, 2011
Tuesday, July 19, 2011
Elephant Kisses
So my cousin (who is really like a sister to me) has been going through a really tough time. She is also in the process of moving to a new place. So when I saw my July kit from Scraps of Darkness and that it involved elephants I knew I had to make her a cheering up/ housewarming present. My cousin has this (unhealthy ;)) obsession with elephants. As does her mother (my aunt) who used to give us 'elephant kisses' when we were younger. Hence the title of my project:
I used a 10x10 canvas for this. I used papers from the kit as the background and painted over it with water colors, acrylics, and mists. It was a complete trial and error thing. I tried something, if I didn't like it I spritzed it with water, rubbed a paper towel over it, and tried something else. I am pretty happy with the results and it was so much fun to make. Completely de-stressing.
To make the frame I stamped an image with gesso, and painted a square around the canvas with gesso, added embossing powder, heat embossed it, and then I went over it with a watercolor. I added the jewels to balance the flowers on the other corners out.
This was another trial and error result. I misted a doily to put in the center and I really hated how it came out. I tried something else, and then I realized that I did like the edges of the doily. So I tore those off and did a makeshift circle (the edges might not have torn off as cleanly as I would have liked). I added stickle dots and a stickle border and I filled in the center with gold paint. I really love how it frames the elephants and gives the project texture.
I had so much fun creating this that I have become completely inspired to do more mixed media canvas projects. I am working on one right now that I am loving how it's turning out. Can't wait to share it with you all!!
I used a 10x10 canvas for this. I used papers from the kit as the background and painted over it with water colors, acrylics, and mists. It was a complete trial and error thing. I tried something, if I didn't like it I spritzed it with water, rubbed a paper towel over it, and tried something else. I am pretty happy with the results and it was so much fun to make. Completely de-stressing.
To make the frame I stamped an image with gesso, and painted a square around the canvas with gesso, added embossing powder, heat embossed it, and then I went over it with a watercolor. I added the jewels to balance the flowers on the other corners out.
This was another trial and error result. I misted a doily to put in the center and I really hated how it came out. I tried something else, and then I realized that I did like the edges of the doily. So I tore those off and did a makeshift circle (the edges might not have torn off as cleanly as I would have liked). I added stickle dots and a stickle border and I filled in the center with gold paint. I really love how it frames the elephants and gives the project texture.
I had so much fun creating this that I have become completely inspired to do more mixed media canvas projects. I am working on one right now that I am loving how it's turning out. Can't wait to share it with you all!!
Sunday, July 17, 2011
Disney Safari *Little Shop of Sketches*
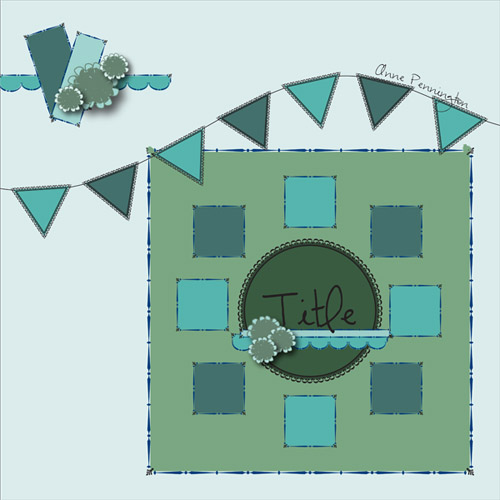
So this week a new sketch for Little Shop of Sketches is out. Here is the fabulous sketch by Anne Pennington:
Now I have to admit that due to some personal things happening in my life right now I have really been struggling with scrapping lately. So I am not really satisfied with my take. However the other DT layouts are fabulous!!
This is titled 'Disney Safari' and I made it using the Scraps of Darkness June kit. Actually the sketch worked really well showcasing these pictures. Ironically only 8 pictures came out really well. I learned during this expedition that it is really hard to take pictures over the head of an 8 year old while in a moving vehicle.
What I love most about this page is the chipboard pieces. I think the colors turned out really well.
Remember to come play along at the ning site!!
Now I have to admit that due to some personal things happening in my life right now I have really been struggling with scrapping lately. So I am not really satisfied with my take. However the other DT layouts are fabulous!!
This is titled 'Disney Safari' and I made it using the Scraps of Darkness June kit. Actually the sketch worked really well showcasing these pictures. Ironically only 8 pictures came out really well. I learned during this expedition that it is really hard to take pictures over the head of an 8 year old while in a moving vehicle.
What I love most about this page is the chipboard pieces. I think the colors turned out really well.
Remember to come play along at the ning site!!
Tuesday, July 5, 2011
Take the Scenic Route
This is a new page for my parent's scrapbook. They are random pics from the drive they took from northern California to Oregon. I finished this page yesterday on the 4th of July which is why I think I felt so inspired to use the red, white and blue color scheme. It is titled 'Take the Scenic Route'.
I spent a long time creating the border around the die cut and circle. I made it with a straight punch which I then cut after every couple of loops to be able to create the curves. I created this page for the July Round Robin challenge over at sb.com. I am in week one and so I had to create a page to inspire the other three weeks. I hope they like this. This is also for the July color challenge over there. That challenge was to use red, white, and blue without using patriotic themed collections. I mostly used the Travel Forever collection by Best Creation. I didn't even realize I was using those colors until half-way though.
In other news, I got published in Scrapstreet magazine!! You can see my page on page 17 in The Spotlight.
I spent a long time creating the border around the die cut and circle. I made it with a straight punch which I then cut after every couple of loops to be able to create the curves. I created this page for the July Round Robin challenge over at sb.com. I am in week one and so I had to create a page to inspire the other three weeks. I hope they like this. This is also for the July color challenge over there. That challenge was to use red, white, and blue without using patriotic themed collections. I mostly used the Travel Forever collection by Best Creation. I didn't even realize I was using those colors until half-way though.
In other news, I got published in Scrapstreet magazine!! You can see my page on page 17 in The Spotlight.
Saturday, July 2, 2011
Little Angel (Little Shop of Sketches)
I am so excited to share with you my take on this week's Little Shop of Sketches sketch. One of my fantastically creative co-design team members Anne Pennington stepped up and created this sketch for Tanya. Here is the sketch:
I literally created this page almost instantly after receiving this sketch. I had so much fun with it! The page is titled 'Little Angel' and features my niece Shea. This is also for my parent's scrapbook (which I seriously need to finish one of these days).
When I saw this sketch I knew I wanted to use doilies as a mask. Unfortunately I has none in my stash (so sad). When I looked it up online I was dismayed to see a pack of three go for almost 4 dollars! I went to my local Hobby Lobby and in the cake decorating section they had packs of 6 (for the big sizes) up to 32 (for the small sizes) for only 2 dollars! I ended up getting 4 different sizes with a total of 50 or more doilies for only 9 dollars. I get sad when I think how some manufacturers overcharge like crazy, and I buy into it because I am so caught up in the coolness of the product! Well thanks to this experience I am going to try harder to be more vigilant about product prices. Ok rant over. Sorry =/
I placed the doily over the papers and just gooped on the gesso. I let it dry a little but not a lot and then spritzed it with a pink mist and a green one. I am crazy in love with how it turned out. It looks much more fantastic in real life too. I also toned down the papers by painting a thin coat of white over them.
I used a smaller doily as a mask for the top. I placed the ribbon, then the doily, and then I misted it. The chipboard title is from Mandy aka Craftysprinkles. Thanks!! I used smooch ink in pink on it and then went over it with some stitckles.
I created the frame around the picture with some smooch ink and stickles. I found this flourish in my stash (that I has completely forgot about) and added it to the bottom of the pic. I cut a piece off of it and used it for the top flower. I very rarely use the whole flourish anymore. I am always cutting them up to suit my needs.
I am not a big fan of pink so I was completely surprised to find these flowers in my stash. I was extremely happy though as I think they went perfectly with the design.
I hope you like and please come play along with us at Little Shop of Sketches!!!
I literally created this page almost instantly after receiving this sketch. I had so much fun with it! The page is titled 'Little Angel' and features my niece Shea. This is also for my parent's scrapbook (which I seriously need to finish one of these days).
When I saw this sketch I knew I wanted to use doilies as a mask. Unfortunately I has none in my stash (so sad). When I looked it up online I was dismayed to see a pack of three go for almost 4 dollars! I went to my local Hobby Lobby and in the cake decorating section they had packs of 6 (for the big sizes) up to 32 (for the small sizes) for only 2 dollars! I ended up getting 4 different sizes with a total of 50 or more doilies for only 9 dollars. I get sad when I think how some manufacturers overcharge like crazy, and I buy into it because I am so caught up in the coolness of the product! Well thanks to this experience I am going to try harder to be more vigilant about product prices. Ok rant over. Sorry =/
I placed the doily over the papers and just gooped on the gesso. I let it dry a little but not a lot and then spritzed it with a pink mist and a green one. I am crazy in love with how it turned out. It looks much more fantastic in real life too. I also toned down the papers by painting a thin coat of white over them.
I used a smaller doily as a mask for the top. I placed the ribbon, then the doily, and then I misted it. The chipboard title is from Mandy aka Craftysprinkles. Thanks!! I used smooch ink in pink on it and then went over it with some stitckles.
I created the frame around the picture with some smooch ink and stickles. I found this flourish in my stash (that I has completely forgot about) and added it to the bottom of the pic. I cut a piece off of it and used it for the top flower. I very rarely use the whole flourish anymore. I am always cutting them up to suit my needs.
I am not a big fan of pink so I was completely surprised to find these flowers in my stash. I was extremely happy though as I think they went perfectly with the design.
I hope you like and please come play along with us at Little Shop of Sketches!!!
Sunday, June 19, 2011
Cinderella's Castle
So here it is! My first design team page for Little Shop of Sketches!! The inspiration came from this sketch:
I absolutely loved this sketch and even though I was crazy nervous about my first DT assignment I had a ton of fun with it. I used my May Scraps of Darkness kit (which I believe has truly been my favorite kit so far, but just barely as those kits are amazing). The page is titled 'Cinderella's Castle'
These pics are of Cinderella's Castle in the Magic Kingdom of Disney World. At night the castle just looks so magical that while I normally only scrap people and activities I couldn't resist scrapping these pictures.
I stickled everything pretty much (like always), misted the bg and purple circle and distressed all the edges.
These flowers were originally light purple. I didn't really like it. So misted they were. I actually made a mistake with one of the mists I used. I thought I had picked up a darker purple color and it turned out to be black. There wasn't anything I could do but to continue with that color and of course no other color was going to show up. So I switched to paints to give it those purple streaks. I am exceedingly happy with this mistake as I believe that the flowers are my favorite part!
Well I hope you like it and please come play along with us at Little Shop of Sketches
I absolutely loved this sketch and even though I was crazy nervous about my first DT assignment I had a ton of fun with it. I used my May Scraps of Darkness kit (which I believe has truly been my favorite kit so far, but just barely as those kits are amazing). The page is titled 'Cinderella's Castle'
These pics are of Cinderella's Castle in the Magic Kingdom of Disney World. At night the castle just looks so magical that while I normally only scrap people and activities I couldn't resist scrapping these pictures.
I stickled everything pretty much (like always), misted the bg and purple circle and distressed all the edges.
These flowers were originally light purple. I didn't really like it. So misted they were. I actually made a mistake with one of the mists I used. I thought I had picked up a darker purple color and it turned out to be black. There wasn't anything I could do but to continue with that color and of course no other color was going to show up. So I switched to paints to give it those purple streaks. I am exceedingly happy with this mistake as I believe that the flowers are my favorite part!
Well I hope you like it and please come play along with us at Little Shop of Sketches
Wednesday, June 15, 2011
Tree of Life
So my latest page is my entry for the June Scraps of Darkness Sketch Challenge. We were given an absolutely gorgeous sketch made by Charlotte Jenkins. Who by the way is also hosting a challenge on Scrapbook.com that uses this sketch and you don't need to use Scraps of Darkness materials (though you should because they are beyond awesome) and you can find that here. My page is titled 'Tree of Life' It features my boyfriend, his mom, sister, and me in front of the Tree of Life in Disney's Animal Kingdom.
So much distressing was done in this page. The bottom page is distressed, inked, crackle painted, and stickled. Next layer I tore and inked the edges, crumpled the paper, and went over it with distress ink. The last layer I used distress stains and inks to create the color, spritzed it with water, crumpled it, and then went over it again with another distress ink.
I used a ton of flowers on this. I barely even changed their color too (I know I was surprised by this as I almost always alter the colors of my flowers). I just spritzed the gold flowers with some gossamer gold, and stickled the white flowers. You would not believe how long I agonized over the placement of each bloom. I think I literally changed their position like a hundred times.
The chipboard circle is courtesy of my Cricut. I forgot how much it sucks cutting chipboard too. What sucks is that I have somehow misplaced my thin chipboard that made cutting a little easier. I swear the deep cut blade is garbage. I only finally got the circle when I switched back to the regular blade in the regular housing. It didn't even turn out perfectly but it was sufficient for my uses. I painted, misted, and smooched the circle to achieve that color.
I love how it turned out and I hope you do too! Be sure to check out those challenges!!
So much distressing was done in this page. The bottom page is distressed, inked, crackle painted, and stickled. Next layer I tore and inked the edges, crumpled the paper, and went over it with distress ink. The last layer I used distress stains and inks to create the color, spritzed it with water, crumpled it, and then went over it again with another distress ink.
I used a ton of flowers on this. I barely even changed their color too (I know I was surprised by this as I almost always alter the colors of my flowers). I just spritzed the gold flowers with some gossamer gold, and stickled the white flowers. You would not believe how long I agonized over the placement of each bloom. I think I literally changed their position like a hundred times.
The chipboard circle is courtesy of my Cricut. I forgot how much it sucks cutting chipboard too. What sucks is that I have somehow misplaced my thin chipboard that made cutting a little easier. I swear the deep cut blade is garbage. I only finally got the circle when I switched back to the regular blade in the regular housing. It didn't even turn out perfectly but it was sufficient for my uses. I painted, misted, and smooched the circle to achieve that color.
I love how it turned out and I hope you do too! Be sure to check out those challenges!!
Tuesday, June 14, 2011
Sexy Time
This page I have done for the June Chippie Challenge and June Steampunk Challenge over at SB.com. The June chippie was a surprise this month and it turned out to be an alarm clock. The steampunk challenge topic this month was 'Steampunk Gentleman'. I combined the two by turning the alarm clock into just a clock face and focusing the page on my boyfriend. The page is title 'Sexy Time' because that is my boyfriends 'sexy' face. Really when he's being playful he'll give me that look to start flirting with me. I love him =)
This page was definitely inspired by Finnabair if you couldn't tell. I made the background with mists and distress stains. By the way how awesome are distress stains? I literally thought that they were overrated until I received some in my June kit at SOD. Now I'm obsessed and want all of them. Unfortunately my budget says I can't so I will just have to be content with what I have.
I gessoed over the buttons and clocks and went back over with some paints and mists. I have two strips of patterned paper that I distressed and I stitched over those and random spots in the bg.
I don't have a sewing machine, nor the space for one. So all my stitching is hand stitching. It takes such a LONG time but I really love the effect.
I used flower packaging for the photo mat. I think it was petaloo. I also distressed the photo a little, which I almost never do but honestly some mist accidentally got on the pic and I decided to go with it rather than try to print the pic again.
This is a close of my chippie. It is from 3tailscraft. I misted it, used smooch inks, and defined the details with a black pen. I then covered it all with glossy accents. I LOVE how it turned out. I love the chippie challenge too because it challenges me to use items I might not use normally. I think this page is also steampunk because of all the clocks but also because of the colors. I don't know why but I associate browns, blacks, coppers, and gold to steampunk.
I had SO much fun with this page. I hope you like it!!
This page was definitely inspired by Finnabair if you couldn't tell. I made the background with mists and distress stains. By the way how awesome are distress stains? I literally thought that they were overrated until I received some in my June kit at SOD. Now I'm obsessed and want all of them. Unfortunately my budget says I can't so I will just have to be content with what I have.
I gessoed over the buttons and clocks and went back over with some paints and mists. I have two strips of patterned paper that I distressed and I stitched over those and random spots in the bg.
I don't have a sewing machine, nor the space for one. So all my stitching is hand stitching. It takes such a LONG time but I really love the effect.
I used flower packaging for the photo mat. I think it was petaloo. I also distressed the photo a little, which I almost never do but honestly some mist accidentally got on the pic and I decided to go with it rather than try to print the pic again.
This is a close of my chippie. It is from 3tailscraft. I misted it, used smooch inks, and defined the details with a black pen. I then covered it all with glossy accents. I LOVE how it turned out. I love the chippie challenge too because it challenges me to use items I might not use normally. I think this page is also steampunk because of all the clocks but also because of the colors. I don't know why but I associate browns, blacks, coppers, and gold to steampunk.
I had SO much fun with this page. I hope you like it!!
Monday, June 13, 2011
Exploring Animal Kingdom
So when I saw the theme for this month's kit at Scraps of Darkness I knew it was meant to be. I try to scrap my pics in chronological order (of course I very loose with this system, if I feel like scrapping a pic I took yesterday more, I will do it) and I just got to my pictures of my family and my BF's family at Animal Kingdom. The papers fit PERFECTLY!! I couldn't have planned it better if I tried. =D The first page I have completed with this fab kit is my layout for the Scrapbook.com June Round Robin challenge. I am in the second week and I had to scraplift SuperAllyFan's page Just Laugh. Here is my page title 'Exploring Animal Kingdom'
I used crackle paint on the orange paper and then I sanded it down some. On the brown paper I used the distressed embossing powder. I used distress stains to get the powder to go where I wanted it too as I don't have embossing ink. It worked!
Crackle paint, inks, and a mist were used on the leaves.
And of course I outlined everything with stickles because I have an addiction/obsession with them. I am so excited to be able to scrap again after my unwilling week and a half off (I could not sit up due to stomach issues and I scrap sitting down). I can't wait for my days off and hopefully I will have much more to show you!
I used crackle paint on the orange paper and then I sanded it down some. On the brown paper I used the distressed embossing powder. I used distress stains to get the powder to go where I wanted it too as I don't have embossing ink. It worked!
Crackle paint, inks, and a mist were used on the leaves.
And of course I outlined everything with stickles because I have an addiction/obsession with them. I am so excited to be able to scrap again after my unwilling week and a half off (I could not sit up due to stomach issues and I scrap sitting down). I can't wait for my days off and hopefully I will have much more to show you!
Wednesday, June 1, 2011
I Made A Design Team!!!
I am so excited that I can finally share this! I made the design team for Little Shop of Sketches!!! It is my first design team and I am so freaking excited!!! If you haven't heard of them before go check them out, they have some AMAZING sketches. One of my favorite pages ever came from a sketch of theirs. You can check out the blog here and the ning site here.You can also see all the other amazingly talented ladies who made the team with me. Congrats to you ladies!! I cannot wait to start working with you! =D
Subscribe to:
Posts (Atom)